

Import
Importing test cases
QA Sphere offers several ways to import your test cases:
| Method | Best for | What happens to your content |
|---|---|---|
| QA Sphere CSV | QA Sphere exports and files in QA Sphere's test case format | Imported as-is |
| Built-in importers | Exports from Qase, TestRail, Testomat, or Zebrunner | Imported as-is |
| AI Assisted Import | Exports from other tools, spreadsheets with one test case (or one step) per row | Restructured into QA Sphere fields, wording unchanged |
| Bulk Write with AI | Prose, notes, requirement documents, loosely structured lists | Rewritten into test cases; new cases may be added |
| Assisted import | Large, complex, or non-standard migrations | Imported by our team from the spreadsheet you send us |
Prefer the first method that fits: the QA Sphere CSV import and the built-in importers are exact and give the same result every time, while the AI methods depend on how the AI reads your data. Move down the list only when the previous method cannot represent your data.
Importing from the UI
- Open a project and go to Test Cases tab
- Click

- Select Import
- A CSV Import form will pop up. Select the format: QA Sphere for a QA Sphere export or a file in QA Sphere's test case format, or the source system for a Qase, TestRail, Testomat, or Zebrunner export (or Other for AI Assisted Import)
- Select separator, directory to import into, and pick a file
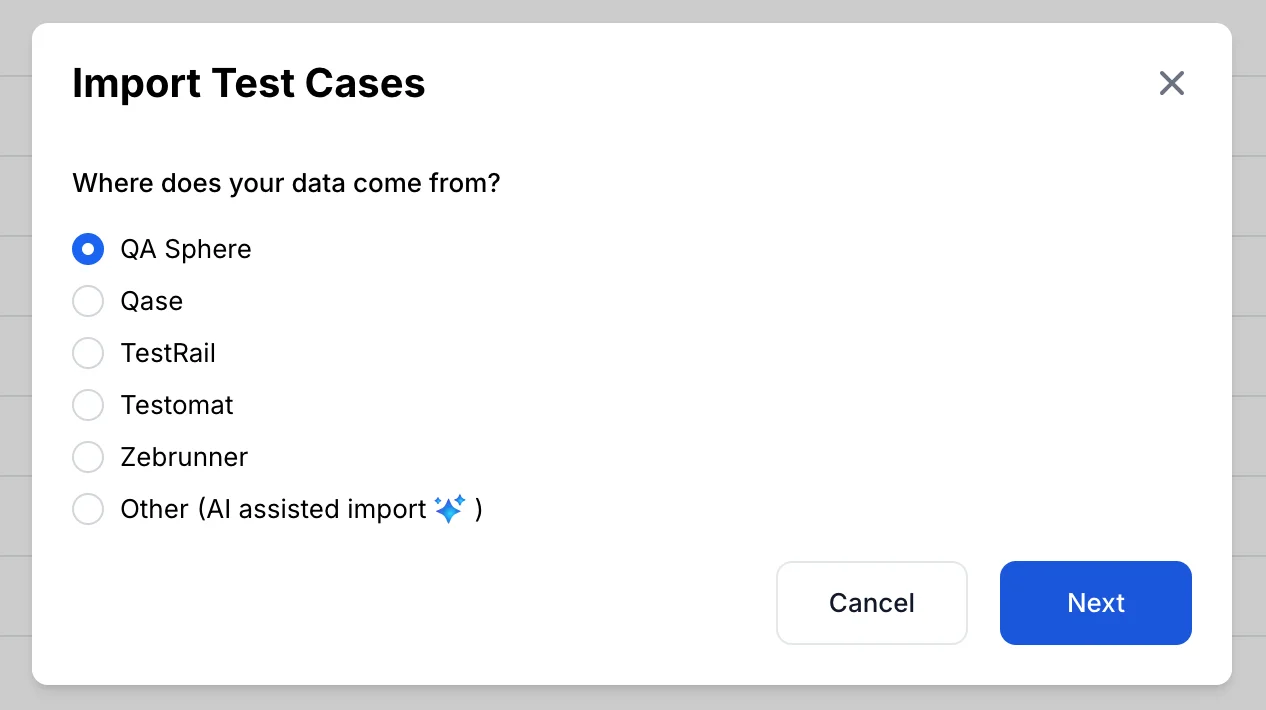
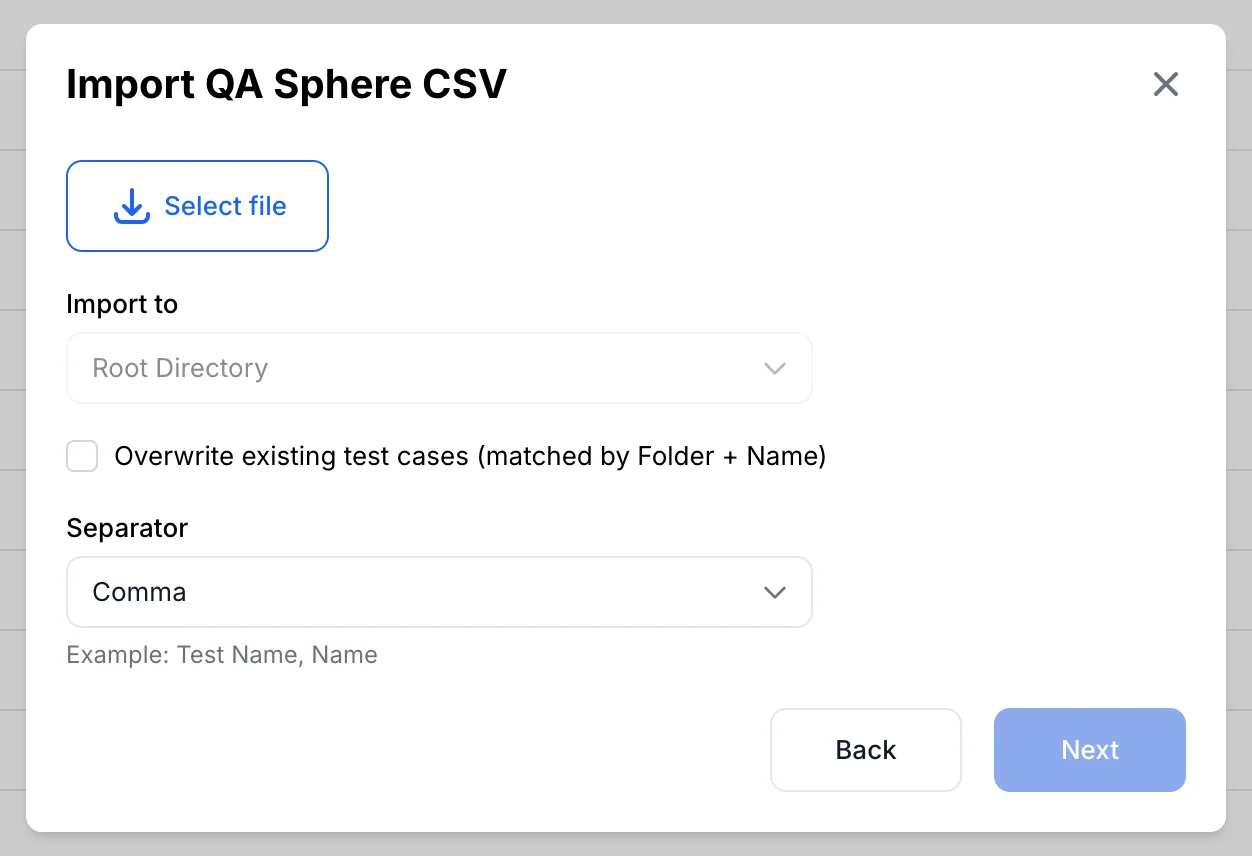
More source systems are added over time. If you are migrating from a TMS that is not listed, contact our support team — we can often handle the migration for you. Export-to-CSV followed by AI Assisted Import, or by reshaping the file into QA Sphere's format below, also works for most tools.
QA Sphere's Test Case Format
Each test case in the CSV table should have the following column structure:
Static Columns (Required):
- Folder: The complete folder path to the test case (e.g., "Integration/API")
- Name: The title of the test case (max 511 characters)
Optional columns:
- Type: The type of test case -
standalone(default) ortemplate - Draft: Whether the test case is work in progress (
trueorfalse) - Tags: Comma-separated tags for grouping and filtering test cases
- Requirements: Comma-separated requirements in format
[Title](URL) - Links: Comma-separated links in format
[Title](URL) - Files: JSON array of file objects with properties:
fileName,id,url,mimeType,size - Preconditions: Test case preconditions or description (supports Markdown)
- Priority: Test case priority -
low,medium, orhigh(Default:medium) - Legacy ID: Test case ID from existing test management system (optional, max 255 characters)
- Parameter Values: JSON array for template test cases (see Template Test Cases section)
- Template Suffix Params: Comma-separated parameter names for filled test case naming
- Folder Comment: A comment to set on the test case's folder. The value is applied to the folder named in the Folder column, so it only needs to be filled on one row per folder.
Dynamic Columns:
After the static columns, there are dynamic columns for:
Steps
- Step 1, Expected 1
- Step 2, Expected 2
- ... (continues based on the maximum number of steps in any test case)
Both Step and Expected columns support Markdown formatting.
Custom Fields
Custom fields appear after step columns with the format:
custom_field_text_{systemName}for text fieldscustom_field_richtext_{systemName}for rich text fieldscustom_field_dropdown_{systemName}for dropdown fieldscustom_field_checkbox_{systemName}for checkbox fields
For dropdown and checkbox fields, the value must match one of the options defined on the field exactly (case-sensitive). Checkbox fields are defined with one or two options, where the first option is the checked value and the second, if present, is the unchecked value — a one-option checkbox is left unchecked by supplying an empty value. See the Test Case Custom Fields API for how to read a project's field definitions and their exact option values.
Custom field values are JSON objects with properties:
value: The field value (max 255 characters)isDefault: Whether this is the default value (optional, boolean)
Example CSV
Download the example CSV to see the format in use. It covers the static, step, and custom field columns and is a good starting point for your own file.
Template Test Cases
Template test cases allow you to create test case templates with placeholders that can be filled with different parameter values. This is useful for testing the same scenario with different data sets.
How Templates Work:
- Create a template test case with
Typeset totemplate - Use placeholders in the format
${parameter_name}in these test case fields - title, preconditions, steps - Provide parameter values in the
Parameter Valuescolumn as a JSON array - QA Sphere generates filled test cases for each parameter set
Parameter Values Format:
[
  {
    "priority": "high",
    "values": {
      "username": "admin",
      "password": "admin123"
    }
  },
  {
    "priority": "medium",
    "values": {
      "username": "user",
      "password": "user456"
    }
  }
]
Template Suffix Params:
Use the Template Suffix Params column to specify which parameters should appear in the generated test case title. For example, if you set username,password and your template is titled "Login Test", the generated test cases will be:
- Login Test (username=admin, password=admin123)
- Login Test (username=user, password=user456)
Alternatively, you can declare title as Login Test for user "${user} with password "${password}" and skip Template Suffix Params
Parameters that are present in the title will be ignored if set in Template Suffix Params.
Since they are already part of the title we don't allow showing them twice.
File Attachments
Files referenced in the CSV must first be uploaded to QA Sphere via the API. The Files column should contain a JSON array with file metadata:
[
  {
    "fileName": "screenshot.png",
    "id": "file-123",
    "url": "https://qasphere.com/files/file-123",
    "mimeType": "image/png",
    "size": 102400
  }
]
See the API documentation for uploading files.
Additional Features:
- Validation: Each test case is validated for correct formatting, field lengths, and required fields
- Custom Fields: Must be pre-defined in the project before import
- Folder Structure: Folders are created automatically based on the paths specified
- Author Assignment: The import process automatically assigns the importing user as the author
- Contributor Management: After a successful import, it creates the importing user as a contributor to the project