

Overview
Configure and use custom issue trackers with QA Sphere
QA Sphere provides flexible integration with virtually any issue tracking system through its Custom Issue Tracker feature. This guide explains how to configure custom issue trackers and provides examples for popular systems.
Configuring Custom Issue Trackers
To integrate any issue tracker into QA Sphere, follow these steps:
- Go to Settings by clicking the gear icon
 in the top right corner and choose Workspace Settings.
 - Select Issue Trackers from the left sidebar.
- A list of all available projects will be displayed. Click the + button next to the appropriate project to add integration.
- Choose Custom from the list of available integrations.
- Provide the required details:
- Issue Tracker Name - A name to identify your issue tracker integration.
- New Issue Link - The URL for creating new issues on your issue tracker. QA Sphere will offer an option to easily navigate to this page while testing.
- Title Extraction Rule - Allows QA Sphere to easily extract the issue identifier and title from its link.
- Value of $(project) for this project - Shown only if either link contains the
$(project)parameter. See Per-Project Parameter.
- Click Add to complete the integration.
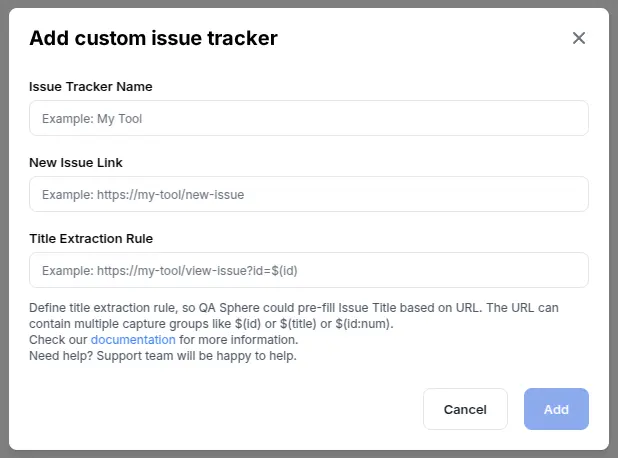
Capturing Groups and Title Extraction Rule
The Title Extraction Rule in custom issue tracker configuration uses capturing groups to properly parse and store issue information. These rules help QA Sphere understand the structure of your issue tracker's URLs.
Basic Syntax
The basic syntax for capturing groups includes:
- $(id) - Captures any characters until the next delimiter
- $(id:num) - Captures only numeric characters
- $(title) - Captures the issue title
Examples of Capturing Groups
- Basic numeric ID -
https://yourtool.com/issues/$(id:num) - Title and ID combination -
https://yourtool.com/$(title)-$(id) - Project and issue number -
https://yourtool.com/$(project)/issues/$(id:num)
Per-Project Parameter
Some issue trackers require a project identifier in the URL, and that identifier differs for every QA Sphere project. To handle this, both the New Issue Link and the Title Extraction Rule may contain the $(project) parameter. Unlike $(id) and $(title), $(project) is not a capturing group: QA Sphere replaces it with a value that you set separately for each project the integration is linked to.
This lets you configure the issue tracker once and reuse it across projects.
Setting the Value
QA Sphere asks for the value whenever the integration is linked to a project:
- When you add a new custom issue tracker from a project, the Value of $(project) for this project field appears in the dialog as soon as either link contains
$(project). - When you link an existing custom issue tracker to another project, QA Sphere opens a Project Parameter dialog that asks for the value and shows a preview of the resulting new issue link.
To change the value later, open Settings → Issue Trackers, find the row in the Project Mapping table, and click the pencil icon. The table shows the current value in the Repository/Project/Team column. If the links use $(project) but no value is set for the project, the column shows $(project) not set and the links are unavailable until you set it.
Example
Configure the integration once:
- New Issue Link -
https://mytool.example/new-issue?project=$(project) - Title Extraction Rule -
https://mytool.example/browse/$(project)/$(id:num)
Then link it to a project and enter 42 as the value. For that project, QA Sphere uses:
- New issue link -
https://mytool.example/new-issue?project=42 - Title extraction rule -
https://mytool.example/browse/42/$(id:num)
Another project can use the same integration with a different value, such as 77.
Whole-URL Templates
A link may also start with $(project), in which case the value supplies the entire base URL. For example, the New Issue Link $(project)/new-issue with the value https://mytool.example/team-a resolves to https://mytool.example/team-a/new-issue.
The resolved link must be a valid http or https URL. QA Sphere rejects a value that produces an invalid URL.
Using Custom Issue Trackers
Once configured, the Custom Issue Tracker integration enables you to link issues from your issue tracker to test case results in QA Sphere. To link an issue during testing:
- Within your project, navigate to the Test Runs section.
- Select an existing test run or create a new one.
- Choose a test case within the run.
- When changing the status of the test case, click + Add Custom Issues and select one of the following options:
- Link issue - Add a link to an existing issue in the issue tracker. QA Sphere will use the configured title extraction rule for the issue tracker to automatically populate the issue title, which can be updated if needed.
- Generate with AI - Use test case details and result comments to auto-generate an issue title and description with the help of AI. Use these details to manually create an issue in the issue tracker, then enter the corresponding URL in QA Sphere. QA Sphere will again use the configured title extraction rule for the issue tracker to automatically populate the issue title, which can be updated if required.
All issues linked to the test case will be saved under the Action History for this test run, providing a clear documentation trail.
- AI issue generation may fail if there is insufficient context from the test case details and result comments to accurately determine the issue observed during testing.
- AI issue generation is not available when batch-adding results for multiple test cases simultaneously.
Available Integration Examples
We provide detailed configuration guides for many popular issue tracking systems:
- Jira (Alternative Method) - Note: Native Jira integration is recommended
- Trello
- GitLab
- Notion
- YouTrack
- ClickUp
- Zendesk
- Sentry.io
- Zoho Desk
- Document 360
- Nuclino
Click on any of the links above to view detailed configuration instructions for that specific issue tracker.
Troubleshooting
If your custom issue tracker integration isn't working as expected:
- URL Structure: Verify that your New Issue Link is correct and accessible.
- Extraction Rule: Ensure your Title Extraction Rule matches the actual URL structure of your issues.
- Project Parameter: If your links use
$(project), confirm that a value is set for the project in the Project Mapping table and that the resolved URL is correct. - Permissions: Check that you have the necessary permissions in both QA Sphere and the target issue tracker.
- Special Characters: If issues contain special characters, ensure they're properly handled in your extraction rules.
For further assistance, contact QA Sphere support at sorted@qasphere.com.