Test Automation Integration with QA Sphere CLI Tool
Introduction
In the rapidly evolving world of software development, teams are increasingly relying on automation to stay agile and maintain high-quality standards. But automating tests is just the first step, getting those results integrated into your test management platform is where the real value comes in. That's where the QA Sphere CLI (Command Line Interface) tool shines.
The QAS-CLI tool automates the process of:
- Processing JUnit XML test results from your automation framework
- Creating test runs automatically or using existing ones
- Mapping test results to your QA Sphere test cases
- Saving test evidence (screenshots, logs) to QA Sphere
- Updating test run statuses and metrics automatically
This integration typically takes 15-30 minutes to set up and can save hours of manual test result entry while ensuring accuracy and consistency in your test reporting.
Prerequisites
Before starting this integration, ensure you have:
- Node.js version 18.0.0 or higher installed
- A QA Sphere account
- Basic familiarity with command line operations
- Your QA Sphere API token (we'll show you how to get this)
Setting Up the Bistro Delivery Project
About Bistro Delivery
Bistro Delivery is a demo project that simulates a food delivery website, serving as a playground for manual and automated testing of modern web application patterns. The project features the following testing scenarios:
- Menu and Product Management
- Shopping Cart Features
- Checkout Process Flow
- Modern UI Patterns
What makes Bistro Delivery particularly valuable for testing is that it represents the most common patterns found in newly built web applications:
-
E-commerce Patterns: Like many modern applications, it deals with product listings, cart management, and checkout flows - patterns that are fundamental to many web applications beyond just food delivery.
-
State Management: The application handles complex state changes, especially in the cart and checkout process, making it perfect for testing state-dependent features.
-
Form Handling: Through its checkout process, it demonstrates common form patterns including validation, error handling, and submission - crucial aspects of most web applications.
-
API Integration: While it doesn't include actual payment processing, the application structure mimics real-world API integrations, making it suitable for testing various integration scenarios.
Initiating the Demo Project in QA Sphere
There are two ways to set up the Bistro Delivery project in QA Sphere: through the automated onboarding process or manual project creation.
Option 1: Automated Setup (Recommended for New Users)
When you first subscribe to QA Sphere, you'll be presented with an onboarding workflow that includes the option to Create an Example Project. This is the quickest way to get started:
- During QA Sphere onboarding, select Create an Example Project
- The system will automatically create the Bistro Delivery project, which includes:
- A complete test case library
- Predefined test runs
- An Automated Testing test run specifically configured for Playwright e2e tests
Note: The project name is used for generating the unique acronym - BD in this case - which would then be referred from the automated tests.
Option 2: Manual Project Creation
- Log in to your QA Sphere account
- Navigate to Projects and click Create New Project
- Enter Bistro Delivery as the project name
- Once created, you'll be redirected to the project overview page. The URL in your browser will look like this:
https://your-instance.region.qasphere.com/project/BD/overview - To load the demo test cases and test runs:
- In your browser's address bar, change the last part of the URL from
overviewtotestingdata - So if your URL was
https://your-instance.region.qasphere.com/project/BD/overview - Change it to
https://your-instance.region.qasphere.com/project/BD/testingdata - Press Enter to load the page
- In your browser's address bar, change the last part of the URL from
- The system will automatically create demo test cases and test runs
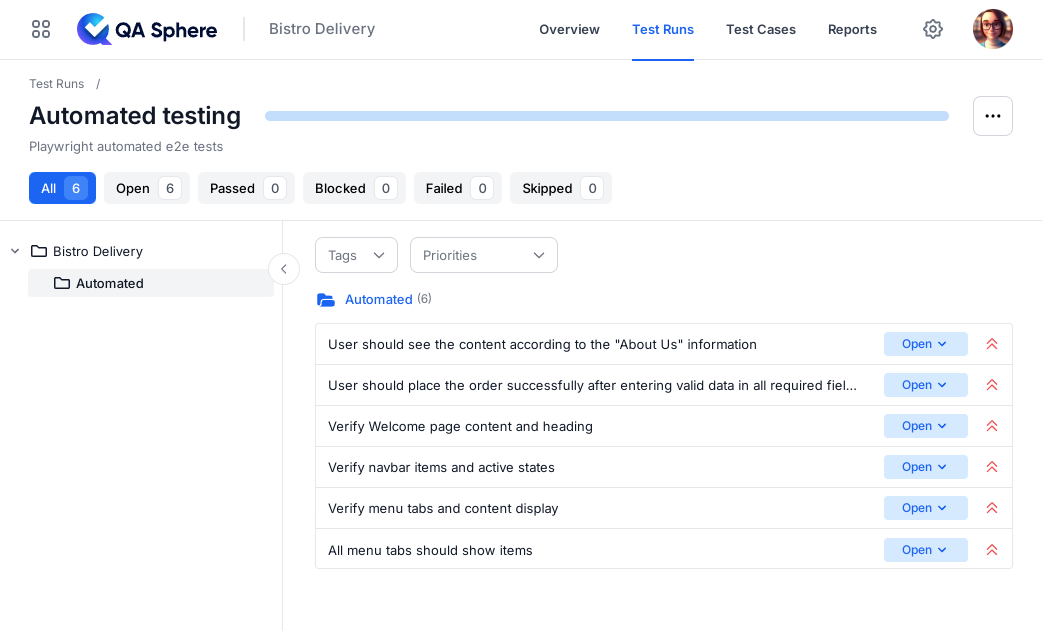
- Go to the Test Runs tab and select Automated Testing
You're now ready to proceed with updating the test run statuses using the demo end-to-end tests.
Setting Up Automated Tests
Cloning the bistro-e2e Repository
The bistro-e2e repository contains Playwright tests that verify the functionality of the Bistro Delivery website.
# Clone the repository
git clone https://github.com/Hypersequent/bistro-e2e.git
cd bistro-e2e

# Install dependencies
npm install
npx playwright install
Running the Tests
The tests are written in TypeScript using Playwright. They're configured to generate JUnit XML reports that we'll later upload to QA Sphere.
npx playwright test
After running the tests, you'll find the results in junit-results/results.xml. The XML file includes:
- Test case names matching QA Sphere's format (BD-XXX: Description)
- Test execution results
- Screenshots as attachments
- Execution time and other metadata
Using QAS-CLI to Upload Results
Installing QAS-CLI
Via NPM (Recommended)
npm install -g qas-cli
Via source code
- Clone the repository:
git clone https://github.com/Hypersequent/qas-cli.git
cd qas-cli

# Install dependencies and build
npm install
npm run build
npm link
- Verify the installation:
qasphere --version
Configuring Environment Variables
The CLI requires two environment variables to be configured:
QAS_TOKEN- QA Sphere API tokenQAS_URL- Base URL of your QA Sphere instance
- Generate an API token:
- Go to QA Sphere Settings
 > API Keys
 - Click Generate New Token
- Copy the token value
- Go to QA Sphere Settings
- Also copy your QA Sphere URL from the browser's address bar
- Configure the variables using one of these methods:
Method 1: Configuration File (Recommended)
Create a .qaspherecli file in your bistro-e2e project directory:
# .qaspherecli
QAS_TOKEN=your_token
QAS_URL=your_qa_sphere_url

# Example with real values:
# QAS_TOKEN=tst0000001.1CKCEtest_JYyckc3zYtest.dhhjYY3BYEoQH41e62itest
# QAS_URL=https://qas.eu1.qasphere.com
Method 2: Environment Variables
Export the variables in your shell:
export QAS_TOKEN=your_token
export QAS_URL=your_qa_sphere_url
Check QA Sphere Documentation for more details.
Uploading Test Results
You have two options for uploading test results:
Option 1: Automatic Test Run Creation (Recommended)
Simply run the following command, and QAS-CLI will create a new test run automatically:
qasphere junit-upload ./junit-results/results.xml
Option 2: Upload to an Existing Test Run
If you want to use an existing test run:
-
Navigate to your project's test run in QA Sphere:
- Go to your project
- Click Test Runs at the top
- Select your desired test run
- Note the test run URL from your browser's address bar
-
Upload the results using the run URL:
qasphere junit-upload -r https://your-instance.region.qasphere.com/project/BD/run/23 ./junit-results/results.xml
The URL structure follows this pattern: https://<domain>.<region>.qasphere.com/project/<project-code>/run/<run-id>
Where:
<domain>: Your QA Sphere account domain (defined during registration)<region>: Your instance's region code (automatically set)<project-code>: Your project identifier (e.g., "BD" for Bistro Delivery)<run-id>: The numeric ID of your test run
For example:
https://mycompany.eu1.qasphere.com/project/BD/run/23
Note: When using an existing test run, make sure to use the exact URL from your browser's address bar when executing the command.
The tool will:
- Create a new test run automatically (if no run URL is provided)
- Match test cases based on the BD-XXX references in the names
- Upload test results including pass/fail status
- Include any attachments (screenshots) if you used the --attachments flag
Verifying Results
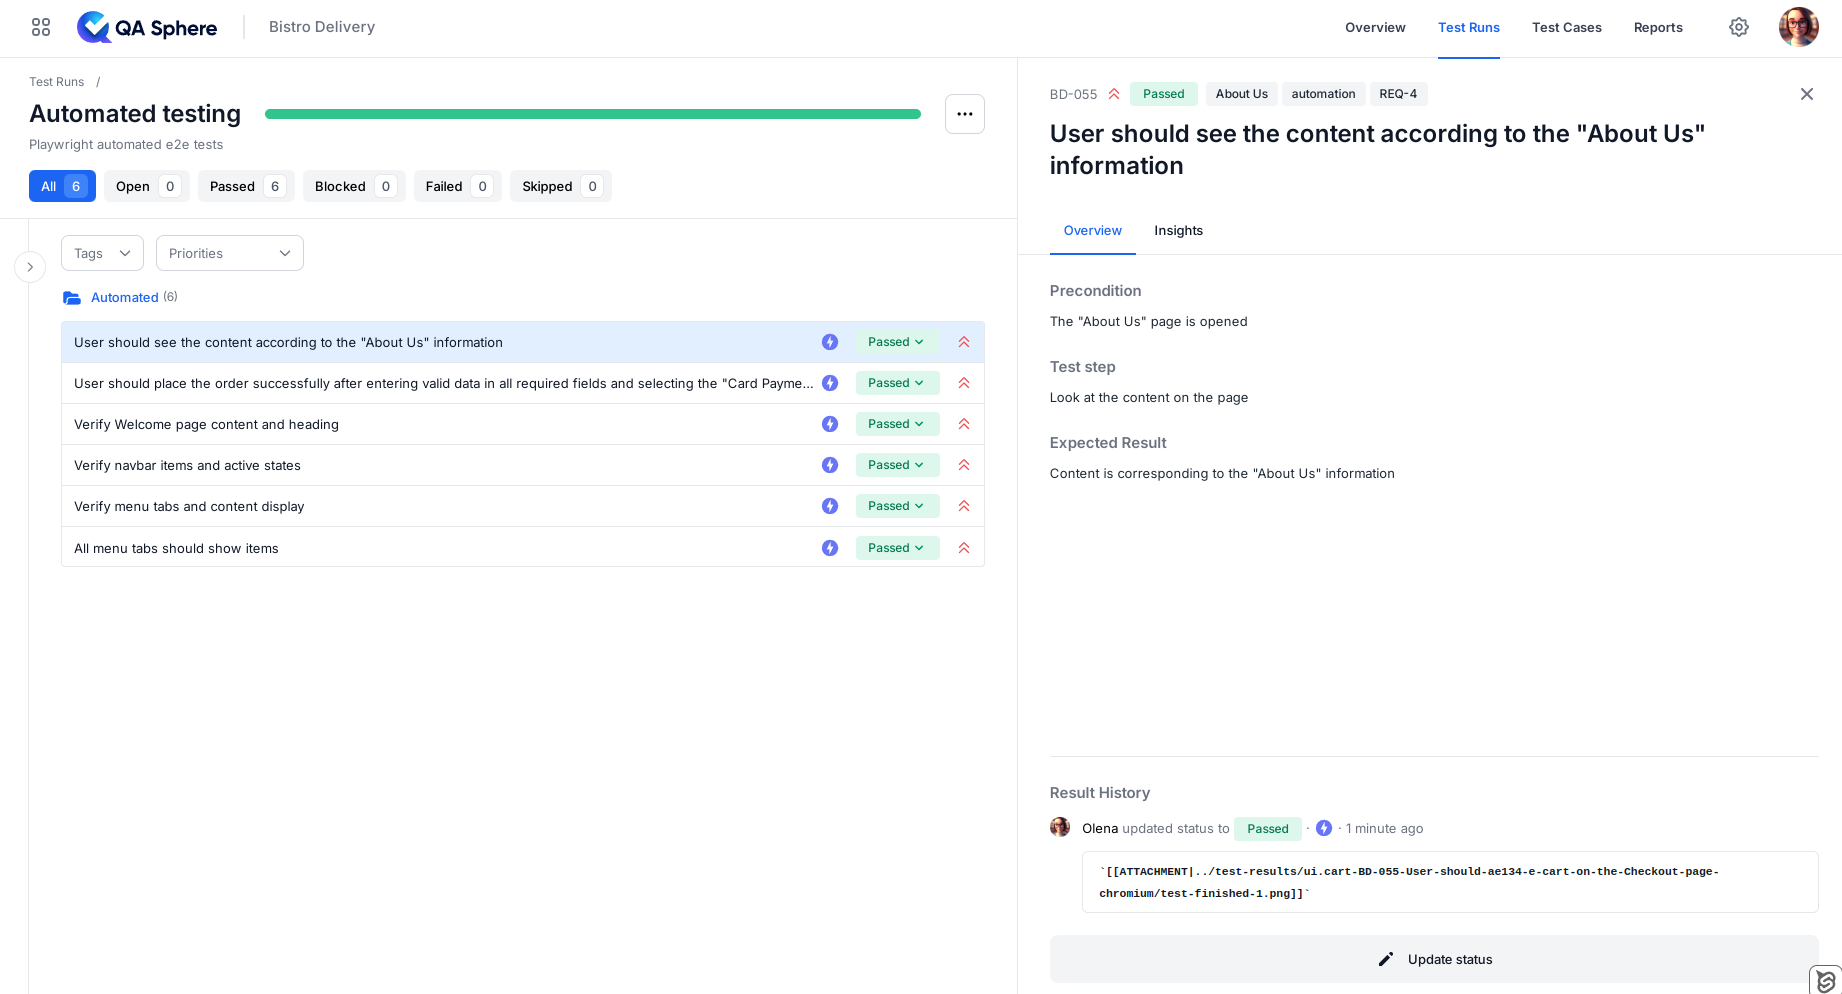
After uploading, check your test run in QA Sphere. You should see:
- Updated test case statuses
- Automation badge
- Links to screenshots
QAS-CLI Commands Reference
Basic Usage
# Create new test run automatically
qasphere junit-upload <junit-file>

# Upload to existing test run
qasphere junit-upload -r <run-url> <junit-file>
Common Options
-r, --run-url     # Optional URL of existing test run
--attachments     # Include test attachments
--force           # Ignore non-critical errors
--help           # Show help information
Environment Variables
QAS_TOKEN=<your-token>    # API authentication token
QAS_URL=<your-url>        # Base URL of your QA Sphere instance
Conclusion
By following this guide, you've learned how to:
- Set up a test project in QA Sphere
- Run automated tests that generate JUnit XML reports
- Use QAS-CLI to upload test results
- Integrate automated tests result reporting into your workflow
This integration helps maintain a single source of truth for test cases and their execution results, making it easier to track test coverage and quality metrics over time.